Deploying a Django application on a CentOS 7
Dec. 23, 2022, 4:12 a.m.
Deploying a Django application on a CentOS 7
-
Install the necessary software: You will need to install Python 3, Django, PostgreSQL, Nginx, and any other dependencies your application requires on the server.
-
Set up a PostgreSQL database: Create a new PostgreSQL database and user for your Django application, and configure your Django settings to use this database.
-
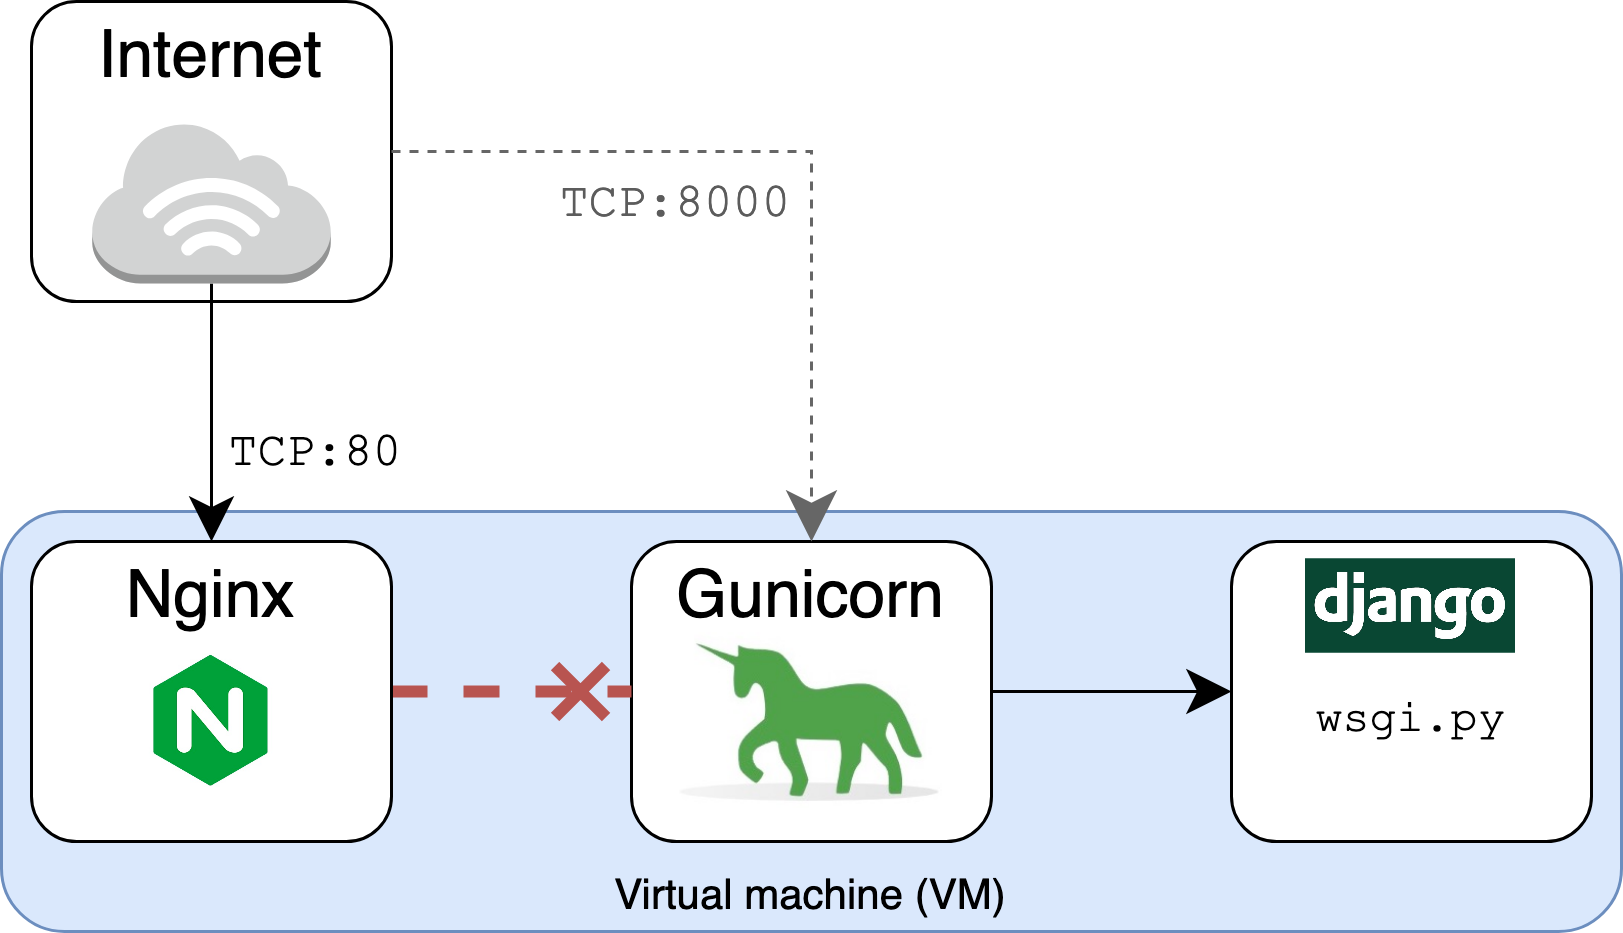
Configure Nginx: Set up a new Nginx server block for your Django application, and configure it to serve your application and static files.
-
Set up a virtual environment: Create a new Python virtual environment for your Django application, and install the necessary dependencies in this environment.
-
Collect static files: Use the
python manage.py collectstaticcommand to collect all of the static files for your Django application into a single directory. -
Migrate the database: Run the
python manage.py migratecommand to apply any database migrations to your PostgreSQL database. -
Test the application: Test your Django application to make sure everything is working as expected.
-
Deploy the application: Use a tool such as
gunicornto run your Django application in the background, and set up a system service to ensure that your application is started automatically on boot. -
Monitor the application: Use a tool such as
supervisorto monitor your Django application and restart it if it crashes.
Here is an example of how you could deploy a Django application on a CentOS 7 server using PostgreSQL, Nginx, and other best practices, including how to configure environment variables such as the secret key:
- Install the necessary software: First, you will need to install Python 3, Django, PostgreSQL, Nginx, and any other dependencies your application requires on the server. You can do this using the
yumpackage manager. For example:
Copy code
# sudo yum check-update && sudo yum update
# Install Python 3 yum install python3 # Install pip (Python package manager) yum install python3-pip # Install PostgreSQL yum install postgresql postgresql-server postgresql-devel # Install Nginx yum install nginx
- Set up a PostgreSQL database: Next, you will need to create a new PostgreSQL database and user for your Django application. You can do this by connecting to the PostgreSQL server as the
postgresuser and using thecreatedbandcreateusercommands. For example:
Copy code
# Connect to PostgreSQL as the postgres user sudo -u postgres psql # Create a new database for your Django application CREATE DATABASE myapp; # Create a new PostgreSQL user for your Django application CREATE USER myappuser WITH PASSWORD 'myapppassword'; # Grant privileges to the new user on the database GRANT ALL PRIVILEGES ON DATABASE myapp TO myappuser; # Quit the PostgreSQL command line \q
- Configure Nginx: Next, you will need to set up a new Nginx server block for your Django application. This will allow Nginx to serve your application and static files. You can do this by creating a new configuration file in the
/etc/nginx/conf.ddirectory. For example:
Copy code
# Create a new Nginx configuration file nano /etc/nginx/conf.d/myapp.conf
Then, add the following configuration to the file, replacing myapp.com with your domain name and /path/to/myapp with the path to your Django application:
Copy code
server { listen 80; server_name myapp.com; location = /favicon.ico { access_log off; log_not_found off; } location /static/ { root /path/to/myapp; } location / { include proxy_params; proxy_pass http://unix:/run/gunicorn.sock; } }
- Set up a virtual environment: Next, you will need to create a new Python virtual environment for your Django application and install the necessary dependencies in this environment. You can do this by creating a new virtual environment using the
python3 -m venvcommand and activating it with thesourcecommand. Then, install the dependencies using thepip installcommand. For example:
Copy code
# Create a new virtual environment python3 -m venv /path/to/myapp/venv # Activate the virtual environment source /path/to/myapp/venv/bin/activate # Install Django and any other dependencies pip install django whitenoise pillow
:
- Collect static files: Next, you will need to use the
python manage.py collectstaticcommand to collect all of the static files for your Django application into a single directory. This will allow Nginx to serve these static files more efficiently. For example:
Copy code
# Collect static files python manage.py collectstatic
- Migrate the database: Next, you will need to run the
python manage.py migratecommand to apply any database migrations to your PostgreSQL database. This will ensure that your database is up-to-date and ready to be used by your Django application. For example:
Copy code
# Migrate the database python manage.py migrate
- Test the application: Next, you should test your Django application to make sure everything is working as expected. You can do this by running the
python manage.py runservercommand and accessing your application in a web browser. For example:
Copy code
# Start the development server python manage.py runserver
- Deploy the application: Once you have tested your Django application and everything is working as expected, you can deploy it in a production environment using a tool such as
gunicorn. You can startgunicornby running the following command, replacing/path/to/myappwith the path to your Django application:
Copy code
# Start gunicorn gunicorn myapp.wsgi:application --bind unix:/run/gunicorn.sock
You can then set up a system service to ensure that gunicorn is started automatically on boot. For example, you can create a new file in the /etc/systemd/system directory called gunicorn.service with the following contents:
Copy code
[Unit] Description=Gunicorn service After=network.target [Service] User=<username> Group=<groupname> WorkingDirectory=/path/to/myapp ExecStart=/path/to/myapp/venv/bin/gunicorn myapp.wsgi:application --bind unix:/run/gunicorn.sock [Install] WantedBy
- Monitor the application: Finally, you can use a tool such as
supervisorto monitor your Django application and restart it if it crashes. This will ensure that your application is always running and available to serve requests.
To install supervisor, you can use the pip install supervisor command. Then, create a new configuration file in the /etc/supervisord.d directory called myapp.ini with the following contents, replacing /path/to/myapp with the path to your Django application:
Copy code
[program:myapp] command = /path/to/myapp/venv/bin/gunicorn myapp.wsgi:application --bind unix:/run/gunicorn.sock directory = /path/to/myapp user = <username> stdout_logfile = /var/log/myapp.log stderr_logfile = /var/log/myapp.log autostart = true autorestart = true startsecs = 10 stopwaitsecs = 600
To configure environment variables such as the secret key, you can use the export command in the myapp.ini file. For example:
Copy code
[program:myapp] command = export SECRET_KEY='mysecretkey'; /path/to/myapp/venv/bin/gunicorn myapp.wsgi:application --bind unix:/run/gunicorn.sock directory = /path/to/myapp user = <username> stdout_logfile = /var/log/myapp.log stderr_logfile = /var/log
To start supervisor, you can use the supervisord -c /etc/supervisord.conf command. To stop supervisor, you can use the supervisorctl shutdown command.
That's it! By following these steps, you should be able to deploy your Django application on a CentOS 7 server using PostgreSQL, Nginx, and other best practices for deployment. This will set you up with a scalable and maintainable deployment that can handle high traffic and keep your application running smoothly.

Malvine - 7 months, 3 weeks ago
This must be awesome
Malvine - 7 months, 3 weeks ago
This must be awesome